SQL Constraints
Constraints are used to limit the type of data that can go into a table.
Constraints can be specified when a table is created (with the CREATE TABLE statement) or after the table is created (with the ALTER TABLE statement).
Here are the most important constraints:
- PRIMARY KEY
- NOT NULL
- UNIQUE
- FOREIGN KEY
- CHECK
- DEFAULT
- IDENTITY
In the sections below we will explain some of these in detail.
-
PRIMARY KEY
The PRIMARY KEY constraint uniquely identifies each record in a database table.
Primary keys must contain unique values. It is normal to just use running numbers, like 1, 2, 3, 4, 5, … as values in Primary Key column. It is a good idea to let the system handle this for you by specifying that the Primary Key should be set to identity(1,1). IDENTITY(1,1) means the first value will be 1 and then it will increment by 1.
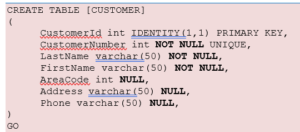
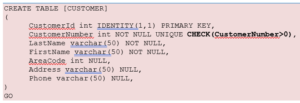
Each table should have a primary key, and each table can have only ONE primary key. If we take a closer look at the CUSTOMER table created earlier:
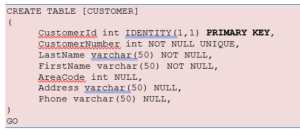
As you see we use the “Primary Key” keyword to specify that a column should be the Primary Key.

Setting Primary Keys in the Designer Tools:
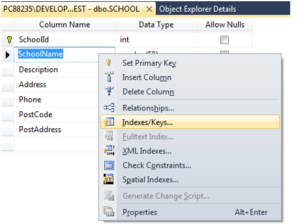
If you use the Designer tools in SQL Server, you can easily set the primary Key in a table just by right-click and select “Set primary Key”.
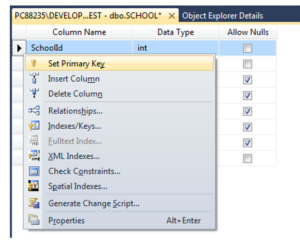
The primary Key column will then have a small key in front to illustrate that this column is a Primary Key.
-
FOREIGN KEY
A FOREIGN KEY in one table points to a PRIMARY KEY in another table.
Example:

We will create a CREATE TABLE script for these tables:
SCHOOL:
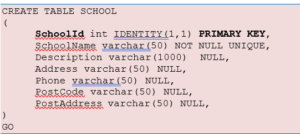
CLASS:
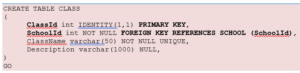
The FOREIGN KEY constraint is used to prevent actions that would destroy links between tables.
The FOREIGN KEY constraint also prevents that invalid data from being inserted into the foreign key column, because it has to be one of the values contained in the table it points to.
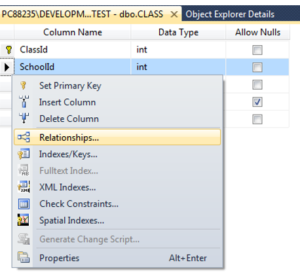
Setting Foreign Keys in the Designer Tools:
If you want to use the designer, right-click on the column that you want to be the Foreign Key and select “Relationships…”:
The following window pops up (Foreign Key Relationships):
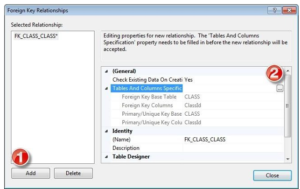
Click on the “Add” button and then click on the small “…” button. Then the following window pops up (Tables and Columns):
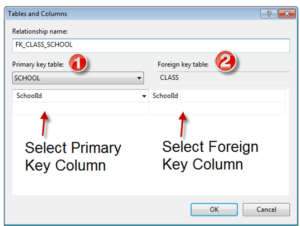
Here you specify the primary Key Column in the Primary Key table and the Foreign Key Column in the Foreign Key table.
-
NOT NULL / Required Columns
The NOT NULL constraint enforces a column to NOT accept NULL values.
The NOT NULL constraint enforces a field to always contain a value. This means that you cannot insert a new record, or update a record without adding a value to this field.
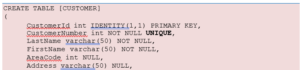
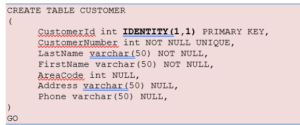
If we take a closer look at the CUSTOMER table created earlier:
We see that “CustomerNumber”, “LastName” and “FirstName” is set to “NOT NULL”, this means these columns needs to contain data. While “AreaCode”, “Address” and “Phone” may be left empty, i.e, they don’t need to be filled out.
Note! A primary key column cannot contain NULL values.
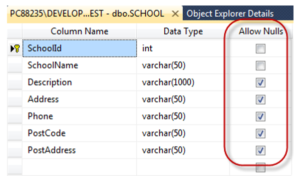
Setting NULL/NOT NULL in the Designer Tools:
In the Table Designer you can easily set which columns that should allow NULL or not:
-
UNIQUE
The UNIQUE constraint uniquely identifies each record in a database table. The UNIQUE and PRIMARY KEY constraints both provide a guarantee for uniqueness for a column or set of columns.
A PRIMARY KEY constraint automatically has a UNIQUE constraint defined on it.
Note! You can have many UNIQUE constraints per table, but only one PRIMARY KEY constraint per table.
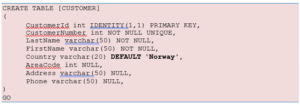
If we take a closer look at the CUSTOMER table created earlier:

We see that the “CustomerNumber” is set to UNIQUE, meaning each customer must have a unique Customer Number. Example:

Setting UNIQUE in the Designer Tools:
If you want to use the designer, right-click on the column that you want to be UNIQUE and select “Indexes/Keys…”:
Then click “Add” and then set the “Is Unique” property to “Yes”:
-
CHECK
The CHECK constraint is used to limit the value range that can be placed in a column.
If you define a CHECK constraint on a single column it allows only certain values for this column.
If you define a CHECK constraint on a table it can limit the values in certain columns based on values in other columns in the row.
Example:
In this case, when we try to insert a Customer Number less than zero we will get an error message.
Setting CHECK constraints in the Designer Tools:
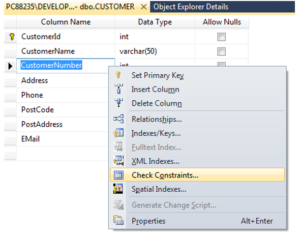
If you want to use the designer, right-click on the column where you want to set the constraints and select “Check Constraints…”:
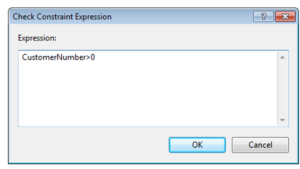
Then click “Add” and then click “…” in order to open the Expression window:
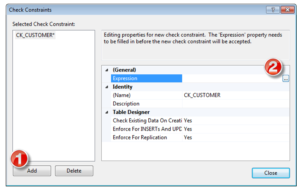
In the Expression window you can type in the expression you want to use:
-
DEFAULT
The DEFAULT constraint is used to insert a default value into a column.
The default value will be added to all new records, if no other value is specified.
Example:
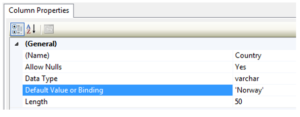
Setting DEFAULT values in the Designer Tools:
Select the column and go into the “Column Properties”:
-
AUTO INCREMENT or IDENTITY
Very often we would like the value of the primary key field to be created automatically every time a new record is inserted.
Example:
As shown below, we use the IDENTITY() for this. IDENTITY(1,1) means the first value will be 1 and then it will increment by 1.
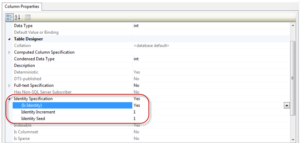
Setting identity(1,1) in the Designer Tools:
We can use the designer tools to specify that a Primary Key should be an identity column that is automatically generated by the system when we insert data in to the table.
Click on the column in the designer and go into the Column Properties window:
-
ALTER TABLE
The ALTER TABLE statement is used to add, delete, or modify columns in an existing table.
To add a column in a table, use the following syntax:

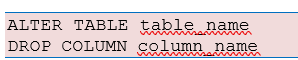
To delete a column in a table, use the following syntax (notice that some database systems don’t allow deleting a column):
To change the data type of a column in a table, use the following syntax:

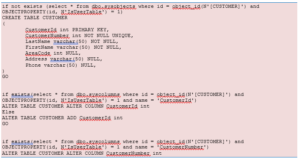
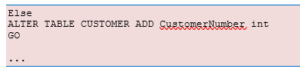
If we use CREATE TABLE and the table already exists in the table we will get an error message, so if we combine CREATE TABLE and ALTER TABLE we can create robust database scripts that gives no errors, as the example shown below: